Costs of Wooden Fence Installation
A wood fence installation company should walk the property and take measurements to provide a quote for material cost. They should also ask if the homeowner has any add-ons in mind, such as gates or post caps. Visit Website to learn more.
 The homeowner may need to call 811 to have buried gas, water, and electricity lines marked before beginning construction. Obtaining a permit and getting HOA approval are other possible obstacles.
Wood fencing is an economical way to enhance your yard and provide privacy while protecting children, pets, and other family members. However, wood fence installation costs can vary widely depending on your preferences and the type of wood you use. This is why it’s important to compare different options and prices before making a decision. Additionally, you should factor in the cost of any add-ons that may increase your overall project.
There are several factors that can affect the cost of wood fencing, including the type and size of your yard. Larger yards require more materials and will cost more to build. In addition, the cost of your wood will depend on its type and quality. Some wood types are more expensive than others, and some are difficult to find or purchase (such as black locust).
A fence’s height can also impact its price. A shorter fence will be cheaper than a taller one. In addition, you’ll need to consider the cost of additional hardware, such as posts and gates. These accessories will increase the price of your wood fence significantly.
Other costs associated with installing a wooden fence include land preparation, permits, and waste removal. Land preparation can be a significant expense, and may require the excavation of dirt or the removal of existing trees and plants. In addition, if your property has an incline, your contractor will likely need to grade the land before building the fence.
Post caps and toppers are another popular add-on that can boost your wood fence’s cost. These items can range from $5 to $50 per item and are available in a variety of styles. If you choose to add a cap to your wood fence, be sure to choose a durable material that will hold up to the elements.
Adding a waterproof sealant to your wooden fence will help it stand up against rain and snow. It is recommended to reapply the sealant every six months to two years. You can purchase a wood-safe sealant online or at most home improvement stores.
Materials
Wood offers the most design flexibility of any fence material with options for picket, panel, board-to-board, shadowbox, and rustic boundary fences. It also is among the most affordable materials to install. With proper maintenance, a wood fence can last 20 years or more. Whether you’re building a fence to mark your property line, keep pets or children safe, or enhance your curb appeal, it is important to choose the right type of wood for your project.
Cedar wood is a popular choice because of its durability and aesthetics. It has a light color that allows for easy customization with stain, and it can resist warping over time. It also is resistant to insects and rot, making it an ideal fencing material for dry climates.
Cypress is another popular wood fencing option that can be used alone or in combination with pine and other softwoods. The dense wood is weather-resistant and can dispel water, but it is not as durable as cedar or redwood. Cypress is also more expensive than other woods, as it contains the preservative cypretine that naturally blocks insect infestations.
Douglas fir is another common wood choice for fences, and its varying coloration — from light brown to a yellowish hue with sporadic knots — makes it an attractive option. It is also easily stained, allowing homeowners to create a custom look for their home or business. While fir is cheaper than cedar and redwood, it does not have as much resistance to termites and rot.
Pressure-treated wood is another economical option for wooden fences, and it comes in a variety of colors and finishes to suit any style or budget. This type of wood is treated with preservatives and chemical stabilizers that help prevent damage from bugs, fungus, and swelling. While it doesn’t have as long a lifespan as other types of wood, it is more stable than pine and spruce.
Before beginning the construction of a new wood fence, you should check with local government officials to see what restrictions or permits are required. It is also important to consult your local utilities company for information about buried power lines or other underground services that could be affected by the fence installation.
Installation
Before you start building your wood fence, you must prepare the area where it will go. This includes trimming any trees that hang over the spot where you want your fence, or even removing them completely if needed. Many fence contractors will do this for you, but they will usually charge an additional fee. You also need to dig holes for the fence posts and install a concrete base. If you’re planning on hiring a contractor to do this for you, be aware that they may add a surcharge based on the size of your yard.
You should then outline the area for your fence using mason’s line, and use a spray can of paint to mark the location of the gate, as well as where you want to walk along it. This will help you get a visual of how your finished product will look, so you can make sure it’s the right style and layout for your needs. You’ll also need to determine if you want a gate, and decide whether to have it at the end of your fence or midway through it.
When it comes to wooden fence installation, the type of wood you choose can greatly affect the cost. Cedar, for example, is an attractive material that offers long-lasting durability. It also resists the elements and insects better than other varieties of wood. Other popular options include pine and spruce, both of which are less expensive than cedar.
Once the posts are in place, you can remove the braces and batter boards. After that, you can measure and mark the locations of the rails. Ideally, the rails should be evenly spaced apart. For a 4-foot fence, one top and bottom rail will suffice, but taller fences benefit from a third rail in the middle for support.
You should check with your local municipality to find out if you need a permit for a wooden fence. If so, you’ll need to follow height restrictions and setbacks from property lines. It’s also a good idea to call your utility company to find out what services run through or near the area where you plan to build your fence. This will save you from accidentally digging into a live wire or other important service.
Maintenance
Most fences, including wood fences, require some level of maintenance to keep them looking good and functioning properly. The amount of work required will vary depending on the type of materials used, and the location of the fence. Staining and sealing are typically the largest jobs that must be undertaken. A professional fence installation service should be able to provide you with pricing estimates for these services, as well as other maintenance tasks.
It is recommended that you reseal the fence every couple of years, even if you don’t use a lot of water on your property. This will help prevent both dry and wet rot, which can cause the wood to deteriorate and lose its structural integrity. Staining also helps to protect the fence from fading in color due to exposure to sunlight and other weather elements.
To keep the fence clean, you should wash it down with a hose or garden hose at least once a year to remove dirt and other debris from the surface. You can also use a pressure washer for more thorough cleaning. Chlorine bleach or white vinegar will help kill mildew and algae stains.
Keeping your wood fence free from weeds, vines, and other plants will prevent moisture build-up. This will help you avoid rotting and the growth of moss, which can damage the fence’s structure and appearance. Adjusting sprinklers so they don’t hit the fence will also help, as will trimming back bushes and other plant life.
Once a year, you should walk around the entire fence and inspect it for signs of rot or other damage. If any sections of the fence are loose or have a crack in them, you can fix them by using a wood epoxy to seal the crack. It’s important that the epoxy is waterproof to ensure it won’t leak into and deteriorate the surrounding wood.
Check for any damaged or rotted posts and replace them as needed. You can also add a concrete spur to the bottom of each post to prevent it from sinking into the ground, which can weaken it and cause it to break or collapse.
Add Rustic Flair to Your Property With Split Rail Fencing
If you are looking to add a touch of rustic flair to your property, split-rail fences provide the perfect look. These simple fences are affordable, easy to assemble, and require minimal maintenance.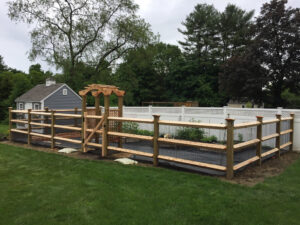
The large spaces throughout Gaston Fence also prevent livestock from getting through. This makes them ideal for homes that are located in rural areas.
Homeowners looking to fence their property are faced with a number of options. They may decide that a chain-link fence is adequate, or they could opt for a wooden privacy fence. However, some homeowners may find that the best option for their needs is a split-rail fence. Split rail fences are typically found on farms and ranches, and they can also add rustic charm to suburban properties and acreage homes.
The beauty of a split-rail fence is that it can be molded to fit the style and appearance of your property. If your house is built in a Victorian style, for example, you can choose a wood split rail fence that reflects that look. Conversely, if your property is located in a rural area and you want to give it a more rustic feel, you can choose a dark-stained split rail fence that will complement the surroundings.
In addition to its aesthetic appeal, a split rail fence offers an affordable alternative to more expensive fence materials. Because split-rail fences use fewer posts and rails than other types of fencing, they can be constructed at a lower cost. Split rail fences are often made from untreated woods such as cedar, locust, and hemlock, and they have a natural beauty that will add to the visual appeal of your landscape.
One of the primary reasons that split rail fencing was popular among colonial farmers and homesteaders is that it is flexible enough to move as needed. Unlike other fencing types, which require concrete or other permanent hardware to be in place, split rail fences can be easily removed and moved if you need to reposition your land boundaries. This flexibility is also beneficial if you have livestock that needs to be contained or if you decide to change the layout of your property.
Another benefit of a split-rail fence is that it doesn’t obstruct your view of your yard or backyard. The open design of split rail fences allows you to enjoy your outdoor spaces without having to worry about pesky neighbors peering over your property line. If you’d like to keep your neighbor’s eyes off your property, you can always install wire mesh in suitable places on your split rail fence.
Security
Many people choose to have split rail fences put up on their properties because they want a rustic look. This type of fencing looks good and can make a property stand out from others that don’t have the same style. You can also paint or stain this type of fence to suit your personal preferences.
Aside from aesthetics, split rail fencing is a great way to keep trespassers off your land. Having a barrier around your property can discourage any type of trespassing and will let any neighborhood watch members know that someone is on their grounds and they should report it to them.
Another benefit of split-rail fencing is that it can handle rugged terrain better than other fences. This means you can have a split rail fence on your property even if it isn’t flat, and you might need to dig some holes to get it in place. This is a good option for those who have land with a lot of slopes and don’t want to pay to have a retaining wall or another type of fence installed.
If you have kids or pets, a split-rail fence with wire is a good way to keep them from running off into the street. This type of fence can also be used to contain livestock on a ranch or zoo and is a common choice for those who have farms.
It is a good idea to review local building codes concerning fence restrictions prior to having a split rail fence installed. These laws may have different requirements than those for other types of fences, such as height limitations. You should also check with neighbors who might share the property line to find out if they have any requirements for the fence as well.
As you can see, split rail fences have a lot to offer residential and commercial properties. They can be a great visual marker for property lines, provide a decent amount of security, and are easy to construct. If you are interested in this type of fencing, contact the professionals at Fence Craft of Upland today.
Durability
Split-rail fences are a durable option that offers a long lifespan. They can withstand the elements and are a good choice for homeowners looking to keep their property secure and aesthetically pleasing without spending a lot of money. Because they are made from wood, these fences require less maintenance than other types of fencing. They also tend to cost less than fences that use other materials. Depending on the type of wood used, stains or paint can help preserve the life of your split rail fence and make it look like new for a longer period of time.
Originally, the settlers who built split rail fences chose American chestnut due to its ease of splitting and natural resistance to rot. However, the chestnut blight destroyed this species, so today, most split rail fences are constructed from cedar. To build a split rail fence, logs are cut to 12–18-foot lengths and then split into sections that range in size from quarters to eights. Each section produces anywhere from four to over a dozen rails that are then stacked on top of one another.
Since split-rail fences have large openings throughout, they can discourage trespassing. They can also work well to define a property line and help a homeowner keep his or her backyard from being overrun by the neighbors’ livestock. Moreover, the rounded posts and rails are less likely to injure someone who runs into them.
For more security, homeowners can choose to add gates to their split-rail fence. Alternatively, they can opt for wire-mesh split-rail fences. These fences have wires interwoven between the rails to discourage unauthorized entry and can be more effective at keeping out livestock.
While a split-rail fence is not as sturdy as other options, it can offer an adequate level of protection for your home. It can deter a burglar or vandal from entering your home, and it can also discourage neighbors from using your property for illegal activities. Furthermore, a split rail fence can help you identify any suspicious activity by making it clear where your property ends and the neighbor’s begins.
Ease of Installation
Split-rail fences have long been a popular choice for defining property lines and providing a rustic aesthetic. They’re often seen in rural areas and can bring to mind images of sprawling horse farms or large ranches. Their simplicity in construction and design makes them easy to install for homeowners who want to do it themselves.
Because of this, they’re also one of the easiest types of fences to maintain over time. Repairs are rare and usually caused by leaning posts or rotted wood, which can be fixed by simply cutting down the affected part of the fence and replacing it with new material.
As with any fencing project, it’s always recommended that you check local laws and regulations before you start work on your split rail fence. Some municipalities require a permit, and some have restrictions on where or how tall the fence can be. It’s also important to research your deed and locate any easements that may interfere with the location of your fence. Finally, always contact your utility companies to have any buried cables marked prior to digging.
Once you’ve taken care of any legalities, it’s time to dig holes for your evenly spaced posts. You’ll need a post hole digger for this, as you’ll need to dig to the depth of the root ball and then some to allow you to set the posts securely. Start with the end posts and then move on to setting the rails. During this phase, it’s helpful to do a dry layout of the entire fence so you can pre-plan any angled gates or sloping sections that may need special attention.
Though splitting a log was originally a laborious task, modern methods and tools make it possible to create split rail fences without a lot of effort. This is why these types of fences are so commonly found in national parks and private residences alike. They’re a reliable option that provides both function and beauty to your property and will continue to be a popular fencing option for years to come. You can find examples of them everywhere you look—in parks, on someone’s yard, or even at that soccer field you played at as a kid.
Masonry Repair
Bricks, stones, and concrete can be used to make beautiful home siding, chimneys, fences, and walls. With preventive maintenance and occasional masonry repairs, these structures can last for years.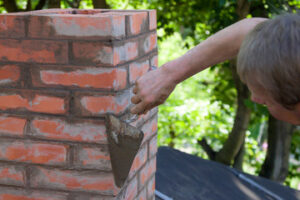
Masonry Repair Charleston SC can involve fixing a brick chimney, repairing stone patios, or even restoring historic building facades. If a wall, chimney, or other structure needs restoration, it is important to have qualified masons take a look at it to see what kind of repairs are needed.
Cracks in masonry can be caused by many different things. They can be a sign of foundation problems, or they could just be due to settlement. It is important to determine the cause of the cracks in order to correct them and prevent further damage. It is also a good idea to have an engineer evaluate the cause of the cracks in order to make any necessary structural repairs.
One type of masonry crack is caused by thermal movement and shrinkage. These types of cracks often appear at the interface of dissimilar materials, such as at a joint in a brick wall. They can also occur at openings, such as doors and windows, or where a building connects to adjacent buildings or walls of different heights. It is possible to minimize these types of cracks by ensuring that the masonry materials have different exposures and conditions and by installing expansion joints in such locations.
Another common type of masonry crack is caused by moisture changes. This is often seen as horizontal or diagonal cracks in brick walls, but it can also be caused by other issues, such as inadequate venting or freeze-thaw cycles. It is important to ensure that water is directed away from the foundation and through the proper drainage systems to reduce these types of masonry cracks.
Brick cracks can also be caused by a number of other issues, such as improper grading or drainage, or by non-standard brick or mortar. It is important to note that just filling in the cracks will not fix the underlying problem, and they may reappear.
Some other common brick cracks include stepping cracks and vertical corner cracks. Stepping cracks are due to a buildup of pressure in the wall, while vertical corner cracks are often caused by drought-like conditions that cause the soil to shrink and move downhill. These types of cracks can be a sign of serious foundation problems, and it is important to consult with a masonry company. They can use a combination of methods to repair these cracks, including hydraulic cement and injection epoxy.
Cracked Mortar
Mortar cracks are a common issue with masonry walls, especially in homes. Most are minor and can be ignored, but others can signal the need for major home repairs. The underlying causes of the cracks vary, from soil movements and climate changes to structural overloading or point loads.
Most masonry structures are built from brick, concrete blocks, or stone laid on beds of mortar. The mortar joints are intentionally weaker than the masonry units, so that any movement in the structure will first show up at the joints rather than at the bricks or stones. This prevents stress from being concentrated on the weakest part of the structure and helps extend the life of the masonry materials.
Unfortunately, the mortar joints are also the most vulnerable to moisture damage. Moisture penetration through the masonry units and into cracks in the mortar will erode the mortar, which eventually leads to crumbling and deterioration of the bricks. The damage will continue to worsen unless the moisture problem is addressed.
The first step to repairing mortar cracks is to clean the old mortar joints. This can be done by scraping loose mortar off the brick face or using a hammer and chisel to break up and chip away the damaged mortar. Make sure to wear safety glasses and a dust mask while working. After cleaning, you can prepare the mortar for new repairs by lightly spraying it with water to moisten it.
If your masonry wall has expansion cracks, have an engineer evaluate the structure to determine the cause of the movement. If the structure is not designed properly, expansion cracks will likely result from overstressing structural elements. The cracks can be relieved by the installation of control joints, which are saw-cut into the wall at a predetermined spacing.
Most masonry wall cracks are due to movement in the underlying soil. As the soil settles, the bricks and their mortar will shift slightly. This can cause small vertical cracks or, in more serious cases, severe structural instability.
Cracked Brick
Mortar cracks are usually minor and can be repaired with a process known as “repointing.” This is the process of filling in the open spaces between bricks or stones that are held together by mortar. Cracks that impact only the bricks or stones themselves will likely need to be addressed through a more extensive approach. This can include managing water or other issues that may be affecting the entire structure.
Cracks that occur within the mortar joints can often be caused by thermal expansion and contraction. This type of crack is not unusual in Michigan, where climate changes can affect masonry structures and the soil they sit on. If these cracks do not exceed 1/2 inch, they are considered normal and need not be addressed further. However, cracks that are larger or extend further into the bricks themselves should be addressed.
Masonry cracks are also often caused by movement of the underlying footing or slab that the structure rests on. This is particularly common in older homes where the original footings were built into and on top of the soil. This type of crack is most often seen in load-bearing walls where the internal tensile stress on the wall is greater than the structural integrity of the footing.
Load-bearing walls should be inspected after any major weather events or seismic activity. A professional mason will examine the cracks and determine if they are caused by a foundation issue and, if so, how serious the problem is. They will then recommend the best course of action to repair the damage.
When repairing cracks in masonry, it is important to use the right repair material. Many people make the mistake of using concrete repair epoxies to seal brick cracks, but this is often ineffective. Epoxy does not bond well with brick, and it may change how moisture vapor passes through the wall, hastening the deterioration of the structure. Alternatively, it is recommended to use a mortar mix that matches the color and texture of the existing brick. This will create a more seamless appearance and help conceal the cracks in the brick.
Damaged Stone
An annual inspection of stone walls by a masonry professional can prevent small problems from turning into large, costly structural failures. These can be caused by erosion, frost heave, and damage to the stone itself. A collapsed stone wall presents a major safety hazard and needs to be repaired as soon as possible.
The simplest and least expensive way to repair stonework is to repoint the mortar joints. This process is also referred to as “tuckpointing.” It involves cleaning the mortar joints, removing any loose or crumbling material, and repointing the joints with new mortar. In stone masonry, the joints are the weakest link and can be easily eroded by water and freeze-thaw cycles.
A masonry mason can use a hand trowel to thoroughly clean the cracks and then fill them with vinyl concrete patcher that has been stained to match the color of the stone masonry. It is a good idea to spread the patcher evenly over the entire crack and then use a pointed trowel to smooth it out and remove any excess material. The patcher will dry for 24 hours, and then the surface of the masonry can be sanded with medium-grit sandpaper to finish it off.
Some stone surfaces are prone to delamination and erosion, especially if they contain lots of veins or if the stones were quarried from soft rock deposits. The occurrence of this type of damage can also be exacerbated by incorrect bedding. For example, copings and cills are usually edge bedded; however, in this case they were face bedded, possibly because it was difficult to discern the bedding pattern or because of ignorance of the consequences.
Other natural causes of deterioration include mechanical damage by the roots of ivy, which may split stone if it enters through crevices. Biological damage may be the result of bacteria that attack the stone or the oxidation of sulfurous acid in polluted air that eats into the surface of the stone.
How to Properly Repair Concrete
A homeowner who sees a crack in concrete might assume that it requires extensive repair, but the type of damage is often more important than the size. It’s also crucial to understand how concrete is different from wood or metal and the proper methods for repairing it.
The best repair materials have low shrinkage because the host concrete has already gone through its own cycle. High shrinkage can cause debonding and failure. Contact Concrete Repair Colorado Springs for professional help.
The success of any concrete repair job depends on proper surface preparation. It is also dependent on using the right repair material. Contractors can use a variety of cement repair products, but it is important to select the product that will best match the type of concrete that needs repaired. The right repair material should be durable enough to serve its intended purpose and should have a service life longer than the existing concrete.
The most common reason that concrete repairs fail is due to a lack of a good bond between the new and old concrete. The quality of the bond is a direct result of the care taken to prepare the surface of the old concrete before the new repair work is put on.
When a contractor is replacing damaged concrete or performing an asphalt patching job, the same good practices should be followed as for placing new concrete. This includes cleaning the surface, scrubbing it, and flushing it with water to remove any loose material. This will ensure that a strong bond is formed between the new concrete and the existing concrete. A bond coat, such as a vinyl-patching compound, should be used to get a good seal.
Contractors should undercut the repair area by five degrees when they are cutting sidewalk flags to prevent a gap between the new concrete and the existing pavement. This undercut will mechanically lock the new concrete to the existing concrete and will also reduce early-age shrinkage.
Portland cement mortar and grout are the most common repair materials used for concrete surfaces. These should be mixed with water to form a thick paste, which should be troweled into the cracks and broken concrete areas. The mortar should be tapped properly to remove air gaps. A final textured finish should be applied to the repaired surface.
In some situations, a urethane sealant can be used to fill in the cracks. This does not create a structural bond and will not stop water from flowing through the cracks, but it does provide a waterproof seal. When a contractor is looking for a concrete repair method that will provide both a structural bond and stop water flow, epoxy injection should be considered.
Mixing
The mixing phase is where contractors get creative. In addition to following package directions for mixing, they must also consider the geometry and structural needs of the repair. For instance, a contractor should not use the same mix for a sidewalk as they would for a driveway because their strength requirements will be different. Concrete mix manufacturers have created a variety of mixes to accommodate the many situations that may arise on a project. It is important for contractors to choose the right one.
The area in need of repair should be swept clean to remove debris, dust, and other contaminants. Then the area should be rinsed with water to make sure it is free of any remaining chemicals that could impact the bond between new and existing concrete. A contractor should also hose off the surface to prepare it for the concrete repair. This helps to ensure the new concrete will adhere and prevent future cracking.
A contractor should also ensure the weather is conducive to pouring concrete. Contractors should check the forecast and know the minimum temperatures, maximum temperatures, and humidity levels needed to pour the concrete for a successful repair. They should also have the necessary tools to complete the repair on site, such as a wheelbarrow or truck to transport and dump the concrete, a cement mixer, and a drill with a paddle attachment for mixing the concrete.
Once the preparation and mixing are complete, the contractor should spread the concrete on the repair site. It is a good idea to use a feathering technique to blend the new concrete into the surrounding dry concrete. This adds to the professional look of the finished product. A texturing tool is also recommended if desired, depending on the setting of the repaired concrete.
All repairs should be properly textured to match the existing surface. Contractors should also ensure the texture is consistent with the cross-section of the repair. If the repair abuts a working joint or crack, a compressible insert medium should be used to maintain the integrity of the repair.
Applying
Concrete repair is a complex process, but there are simple steps to take that will ensure the results are good. The most important aspect is making sure the surface of the old concrete that is receiving the new repair is clean. This can be done by sandblasting, shotblasting, or a similar process. This step is important because if the old concrete is not clean, it will not bond well with the new concrete.
The next step is to apply the new concrete or patching mix to the existing concrete. This can be done using a trowel, but some people also like to use a hand float to create a smooth surface. For larger repairs, a hand or power broom may be used to finish the concrete. For vertical concrete sections that will be replaced with new concrete, a form must be constructed to hold the concrete as it sets.
When repairing cracked concrete, it is necessary to understand why the cracks are occurring. Once this is understood, the proper repair method can be selected. There are several different methods of concrete repair, including epoxy injection, routing and sealing, stitching, drilling and plugging, and gravity filling.
If the deterioration of the concrete is serious, it is recommended that a registered professional engineer be hired to determine the severity of the damage. The engineer can then make recommendations for the appropriate repair method.
During the application phase of concrete repair, it is important to use a quality product that is designed for this type of work. This will help prevent the common problems that can occur, such as premature deterioration or failure of the repair.
For example, a structural repair may require the addition of reinforcing steel to increase the tensile strength of the concrete. This is not an easy task and should only be done by a registered professional engineer.
It is also important to mix the concrete properly, as this will affect whether the repair will last or not. For this reason, many bagged concrete mixes are designed with safety in mind. For instance, they are made with silica removed to comply with all current safety regulations. Additionally, manufacturers such as Quikrete have started to incorporate fibers and polymers into their products to help resist cracking.
Finishing
All concrete has a limited “shelf life.” If it’s exposed to the elements for too long, it’ll degrade and crack. This isn’t a bad thing, but it can be a problem when you need to repair concrete structures. The process of repairing concrete involves reinforcing the concrete to hold it together again.
Choosing the correct concrete repair material is a crucial step in this phase. The right product will help prevent damage to the structural steel, improve the bond with the existing concrete, and provide a strong surface that can stand up to traffic and the elements.
The most common repair materials used are Portland cement mortar or grout and cement concrete. Portland cement grout is ideal for small repairs because it is easy to mix and apply. This product is also able to resist chloride attack, which can be caused by corroded metal embedded in steel reinforcement. Portland cement concrete, on the other hand, has a higher strength than cement grout and is recommended for large-scale concrete repair projects.
It’s important to note that major concrete repair projects should be handled by qualified professional engineers. These professionals can help you determine the cause of the deterioration and design a suitable repair method. They can also assist you with the selection of the appropriate repair materials and construction techniques for the structure in question.
In addition to ensuring that you have the right type of concrete repair material, it’s also vital to make sure that your surface prep is done correctly. The concrete should be clean, free of oil and dirt, and have a proper consistency. Depending on the type of repair, you may also want to add a texturing element to the concrete. This can help enhance the aesthetic of the repaired area and add some visual interest to it.
Finally, the concrete repair must be properly cured. This is accomplished by keeping it moist and preventing it from drying too quickly. This can be achieved by covering it with plastic or using sprinklers around the work site. The length of time for which this is necessary will depend on the mix and the weather conditions.
The Benefits of a Vinyl Fence
A vinyl fence can add style and privacy to your home. It also requires less maintenance than a wood fence. It does not need staining or painting and is resistant to the elements that cause decay in 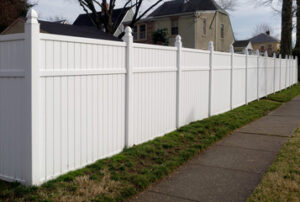 organic materials like wood. Vinyl Fence In NJ is also easy to clean with a hose.
Cost
Vinyl fences are a great way to add value to your property, but they can be expensive. The price depends on the material and style of the fence, and whether you want to add gates or other features. You can find an online fence estimator to get an idea of the cost of your project, but it’s important to remember that these estimates don’t take into account your installation or permit costs.
A high-quality vinyl fence from a reputable manufacturer is worth the initial investment, especially considering that it will last much longer than wood or metal fencing. The longevity of vinyl is one reason why it has become a popular choice for homeowners.
Unlike other fencing materials, vinyl fences are made from man-made products that can be extruded with exact precision and are durable and strong. The material is also nearly impervious to the elements that can cause damage to organic materials, such as wood. It’s also easier to maintain than other fences because it doesn’t require refinishing or painting. However, it will still need periodic cleaning to remove dirt and algae that build up over time.
There are many different styles of vinyl fences, but the most common is a privacy fence that provides privacy for your backyard. This type of fence is usually tall, and it’s ideal for those who want to keep their property safe from neighbors or passersby. Other options include rail fences, picket fences, and trellises. These fences are typically shorter than privacy fences and can be used to showcase decorative plants.
If you’re shopping for a vinyl fence, shop around to find the best deal. Large hardware stores, such as Lowe’s and Home Depot, often stock vinyl fences for your convenience, but they don’t offer the same quality as a specialty store that specializes in building products. In addition, these big-box stores don’t employ experts, so you might not receive the advice you need to choose the right fence for your needs and budget.
A good vinyl fence is moisture-resistant, but it is not waterproof. If you live in a region that experiences a lot of rain, consider investing in an additional barrier, such as a tarp or a rain gutter, to protect your fence from water damage. Additionally, vinyl can warp or crack over time if it’s exposed to extreme temperatures.
Durability
If you want to build a fence on your property that is both attractive and durable, vinyl is an excellent choice. It is a very strong material that can withstand high winds and extreme temperature changes. It also resists damage from insects, including termites and carpenter ants. It is also a great option for people with pets, as it is very difficult for them to chew through. A well-maintained vinyl fence can last up to 30 years, and is significantly longer than a wood fence.
There are many different types of vinyl fencing, and each type offers its own benefits. For example, some vinyl fences are designed for privacy, while others are more decorative. Some even have a faux wood appearance, which is very popular with homeowners. In addition, there are also various color options, including light neutrals and bolder colors like red, green, and blue. Most styles of vinyl fence come in multiple heights, too. This makes it easy to find the perfect match for your home and yard.
One of the biggest advantages of a vinyl fence is that it requires very little maintenance. Unlike wood, vinyl will not rot or mold and is resistant to sunlight and rain. This means that you won’t have to worry about stains or painting, and the fence will look brand new for years to come. In addition, vinyl is a nonporous material, so you can simply spray the fence down with a hose to keep it clean.
Vinyl is a good choice for homeowners with children and pets, as it is easy to clean and does not attract insects. It is also durable, and it can withstand the elements of Utah weather, including snow and hail. However, it is important to note that vinyl is not the best fence for parking lots or in extremely hot climates, and it will be damaged if it is hit with a heavy object.
Regardless of the type of vinyl fence you choose, it is important to install it correctly. This can be done by a professional, or you can do it yourself. If you choose to install the fence yourself, make sure you have the proper tools for the job. This includes a post hole digger, a manual cement mixer for setting the posts, and a level to ensure straight and level runs.
Styles
Whether you’re a homeowner or a business owner, you want to install a fence that looks great and provides security, privacy, and visibility. Vinyl fencing is an excellent option for all of these purposes, and there are many styles to choose from. It’s important to understand the pros and cons of each type of fence so that you can make a wise decision.
Vinyl fences are known for being low maintenance and easy to clean. They don’t require painting or staining and are nonporous, meaning they can be easily wiped down with a hose. This makes them ideal for families with children and pets, as you won’t have to worry about splinters.
Another advantage of vinyl fencing is that it’s often made with recycled materials. This means that it’s environmentally friendly, which is a major selling point for many homeowners. However, some big-box stores sell low-quality vinyl that’s not recyclable, and these products are not very durable. You should always buy vinyl from a trusted company to ensure that you get the best quality possible.
While all vinyl fences are made from the same basic chemicals, there are a lot of variations when it comes to style and appearance. Some companies offer a more natural look, while others use a textured surface that mimics wood grain. It’s important to find a style that matches your home, and you can even choose a color that complements it.
One popular style of vinyl fence is the picket-style. This classic, All-American fence is perfect for front yards and works well with old brick farmhouses or newer colonial-style homes. It can also be used to create a nostalgic main street America feel in an urban neighborhood.
Other types of vinyl fences include screen and post-and-rail. Screen fences are a good choice for privacy, while post and rail fencing is a great way to mark property lines. If you want to add a little more privacy, consider a lattice-top fence. This type of fence is constructed with solid vinyl panels between evenly spaced posts, but it has a lattice pattern on top to provide more privacy without blocking the view.
Installation
Investing in vinyl fence installation is an investment in your home’s safety, security, and privacy. The upfront cost may be higher than a wood fence, but vinyl has a lifespan that is twice as long and will save you money in the long run. Vinyl is also more eco-friendly than wooden or metal fences. This material is made from recycled materials, and when discarded at the end of its useful life, it can be broken down and reformed into other products.
The installation process for a vinyl fence is relatively straightforward. It begins with marking the perimeter of your yard and determining where posts will be placed. This is important because vinyl fences cannot be trimmed, so it’s essential that the measurements are accurate. You can use landscape stakes or mason lines to mark the area. After you have staked out your fence line, use a post-hole digger to dig holes for the posts. Add gravel or sand to each hole to ensure proper drainage and stability. Once the posts are set, install rail brackets and secure them with screws and vinyl adhesive. Once the rail brackets are secured, you can attach the fence panels to them.
One of the best things about vinyl is that it requires very little maintenance to keep it looking great. It is naturally pest-resistant and will not warp or rot, so it does not need to be treated with chemicals. In addition, it is resistant to stains and paints, so it won’t require frequent repainting like a wooden fence.
Despite its low-maintenance appeal, vinyl can still be damaged by weather or by accidents. This damage can be costly, but a few simple steps can help prevent it. First, you should choose a quality vinyl manufacturer. Some manufacturers use lower-quality vinyl formulas, which can lead to brittleness and cracking. To avoid these problems, you should look for a company that uses high-quality ingredients and follows strict manufacturing standards. Also, check whether the company uses UV inhibitors to prevent fading and chalking of the vinyl. Other companies may not use these ingredients, which will result in a lower-quality product.
Things to Consider Before, During, and After Roof Replacement
A roof replacement is a major construction project that takes place directly above your home. It can be expensive, depending on Roofing contractor and materials chosen.
A middle-of-the-road option is reroofing, which adds another layer of shingles over the existing ones. It is less expensive than a full roof replacement, but it has its drawbacks too.
The roofing material you choose is more than just a cosmetic element. It will determine how well your home is protected from the elements and contribute to its overall style. Whether your roof is an original piece for new construction or you’re replacing it on your existing home, there are many choices to consider. Choosing the right materials that fit your needs and budget will ensure that your roof will perform as expected for years to come.
The cost of the materials is a major consideration for many homeowners and will play a large role in their selection process. Asphalt shingles are one of the most common and affordable options for residential roofs and come in a variety of colors and styles. They also have a long life expectancy. Other popular options include ceramic tiles and clay tile roofing, which offer a more traditional look. These types of roofing are durable and energy-efficient, but they are typically more expensive than asphalt shingles.
Another factor to consider is the climate where your house is located. Some materials do better in certain regions, such as ceramic tiles for cold-weather homes and slate tile for varying climates. In addition, some roofs have different pitches and require specialized roofing materials. For example, a low-pitch roof may require a specialized material to help water drain properly.
A qualified contractor can help you decide which materials to use based on the architectural style of your home. This will help you find a style that complements the rest of your house and fits with the neighborhood. For a more eclectic look, you can also go with a faux roofing option that mimics more traditional materials at a fraction of the price.
A final consideration to keep in mind is the weight of the roofing materials and how they will impact the structure of your house. Heavy roofs, such as slate or tile, can add a lot of weight to the house. This will affect the structure and may even require a stronger foundation to support the weight.
Prepare your attic.
The attic is a popular place to store personal items and boxes of sentimental value, but it’s important to clear it out before the roofers arrive. They’ll be walking in and out of it during the reroofing process, and dust and debris will likely fall on your belongings. Cover them with drop cloths or old sheets to protect them.
It’s also a good idea to remove wall hangings, especially if they’re heavy or made of glass, such as mirrors and knick-knack shelves. Vibrations from hammering will shake the walls, and items could be knocked loose.
In addition, make sure that your gutters are clean and free of debris. Your roofers will need to access the gutters and downspouts to check and repair them, and you don’t want them getting clogged with dirt and leaves while they’re working on your new roof.
If you have trees near your house, trim them to keep them from encroaching on the roof. If the branches are too close, they can rub against the shingles, and the vibrations from the hammering may cause them to crack or shatter. Also move outdoor furniture, ceramic landscaping features, and anything else that might be damaged by falling debris during the roofing process.
A good time to get a new roof is in the spring or fall. These seasons typically have milder weather and less moisture, which helps the shingles seal more effectively. It’s also a good time to replace your roof because the contractors aren’t as busy and will be able to get to work sooner. If you’re ready to have your roof replaced, contact a local roofing contractor and schedule an appointment. They’ll give you a quote and help you prepare your home for the project. They’ll also take care of any necessary cleanup once it’s complete.
Keep your pets indoors.
During roofing, loud noises and vibrations from the construction may disturb pets and small children. These situations can be dangerous for them, so it’s best if they find somewhere else to stay during the roofing process if possible. If not, they should be kept indoors, where they will be safe from loud noises and strangers. It would also be a good idea to prepare extra comforts for them, such as treats, toys, and plenty of hiding places. Taking them on long walks and providing them with plenty of exercise can also help soothe their nerves. This is especially helpful for dogs, but it can work for other breeds as well.
This will also help to keep them calm and distracted from the loud noises and disruption of their regular routine.
Prepare your home.
A roof replacement is a noisy process, and constant hammering can disrupt your home’s interior. If you have small children or pets, consider finding temporary accommodations for them during the roofing project. For your own safety and that of your belongings, you should also avoid being home while the roofers work. Your kids and pets can become distressed by the noise and can get hurt by stray nails or debris that falls during the roofing process.
If you can, remove any outdoor toys or furniture from the yard. This will allow the roofers to easily access your home’s roof. It’s also a good idea to clear away anything that protrudes from your lawn, such as sprinkler heads and yard lights. This will help minimize tripping hazards for the roofers.
You should also take down wall decorations such as mirrors, paintings, knick-knack shelves, and collectible china plates. The vibrations caused by hammering on the roof can knock these items loose and damage them. It’s best to move them before the roofers arrive.
Similarly, you should cover any personal belongings in your attic with sheets or tarps to protect them from dust and debris. You should also take down any furniture that’s located near the ceiling to make it easier for the roofers to reach their work zones.
Finally, you should trim any tree branches that extend beyond the roof or work area of your house. This will facilitate cleanup and ensure that the trees are protected from falling debris during the roofing process.
If you have a garage that’s attached to your house, it’s a good idea to move your car somewhere else the night before the roofers start working. This will prevent your car from getting covered in dust, dirt, and nail fragments. You should also remove patio furniture, grills, lawn ornaments, and other items from the garage. If you don’t have the space to move these items, put them in your shed or garage and cover them with a tarp. You should also park your car across the street or in a neighbor’s driveway to prevent it from being damaged by trucks and equipment that may be brought to your house for the roof replacement.
What Is the Role of a General Contractor?
General Contractor Lexington KY oversees the big-picture, top-level facets of a construction project. GCs can work for construction companies or as independent contractors themselves. They are basically day-to-day construction managers who can also be found on the job site swinging a hammer.
They take a set of plans and turn them into a building. This means orchestrating the comings and goings of workers, coordinating an ever-changing schedule, and handling a lot of paperwork, including material bills and payroll.
One of the first things a general contractor must do is secure work. For that, they must respond to requests for proposals, or RFPs, from clients looking to build projects. GCs often create what are called “bids” to respond to these requests, which include estimates for how much the GC will charge for labor and materials. This process is complicated and involves doing quantity takeoffs from project specifications to create the cost estimates. The GC may also consult with subcontractors before creating their bid.
A good general contractor will help clients understand the process of working with a contractor and how the cost estimates are put together. This is an important part of the process because it helps everyone involved in the project be on the same page and understand what’s expected from one another. It’s a way to make sure that expectations are clearly communicated so that construction workers and subcontractors know what they need to do their jobs well.
Once a project is underway, a GC becomes a kind of day-to-day construction manager. They ensure that the project is progressing on schedule and oversee the work of the onsite staff. They also help with more administrative tasks, such as scheduling payroll or implementing safety standards on site.
In addition, a good general contractor will have relationships with suppliers that they have developed over time. These relationships can help them secure the materials for a project at a reduced rate. This is a great way to save money, and oftentimes the savings are passed on to the client.
Depending on the location, local, state, and federal laws may require that a general contractor be licensed. Licensing is a way for the public to verify that the person they are hiring is competent and follows strict guidelines for insurance, taxes, and safety. This is important for the public, but it’s also important for the construction industry to maintain a high standard of ethics and safety.
When choosing a general contractor, be sure to ask for references from previous clients and do some background checking online. A quick Google search will reveal a lot about a GC’s experience, integrity, and reputation. If the first few online reviews are negative, this is a red flag that you should keep searching for a different contractor.
They have experience.
A general contractor’s extensive experience in the construction industry is a significant benefit for any project they take on. They know what needs to be done, when it needs to be done, and how to get it done in the most cost-effective and timely manner possible. Whether you are building an office, a new home, or retail space, a general contractor has the resources and expertise to bring your vision to life.
General contractors are often responsible for a number of tasks on any project, including hiring and training subcontractors, securing building permits when necessary, defining and monitoring budgets throughout the process, and much more. This enables them to understand the ins and outs of all elements of a project, allowing them to provide the best guidance for the rest of the team.
Many states and municipalities require that a general contractor be licensed in order to complete construction work on their behalf. This ensures that they have the skills and knowledge to do the job correctly while following all required regulations and guidelines for insurance, taxes, and safety. Project owners also gain benefits from working with a licensed general contractor, as they can trust that the GC will be able to protect their lien rights, which help guarantee they will get paid for their work once it’s completed.
General contractors are usually familiar with a variety of different construction suppliers, having developed relationships over time that allow them to secure materials at a discounted rate that is then passed on to their clients. This is a great way for property owners to save money on the more expensive items that are needed for any build without having to spend too much time shopping around.
Because they are involved in the process from start to finish, a general contractor has an excellent understanding of how all of the components of a construction project fit together. This allows them to keep everyone on the same page, which helps to prevent costly mistakes and ensure that a project is completed according to its quoted timeline.
They have insurance coverage.
While a general contractor may complete some construction work themselves, they usually do not perform all the labor on a project. Instead, they will usually manage a team of specialized subcontractors to complete the majority of the work. These subcontractors may include plumbers, electricians, masons, carpenters, iron workers, and other specialists.
As such, a general contractor needs to carry both a commercial general liability policy and a workers’ compensation insurance policy for their employees. Typically, the GC will add any uninsured subcontractors to their policy as additional insureds. This ensures that in the event a worker is injured or someone else is hurt on the jobsite, there is coverage to pay for any damages.
In addition, many GCs will also need to purchase an inland marine insurance policy for their construction equipment. This type of policy helps to cover property loss or damage that occurs while equipment is being transported between different job sites.
When determining whether or not to hire a general contractor, it is important to ask for references and do some research online. A good general contractor will have many satisfied customers with positive feedback who can vouch for their experience and expertise.
If you are looking for a general contractor to take on a home improvement project, be sure to ask them to provide proof of their insurance coverage and licenses. Some specialties, like plumbing and well drilling, require state-level licensing. Other specialties, like building one- to three-family homes, do not require licensing by the city.
Another aspect of insurance to consider is a surety bond. This type of policy can protect the client in the event that the GC fails to perform their duties, such as failing to complete the project or stealing funds from the company. A reputable general contractor should be able to obtain these types of bonds with ease. Other policies to consider are the business owner’s policy, professional liability, and inland marine insurance. These policies help to keep the GC and their employees protected against common business issues, such as theft of materials or equipment.
They have custom solutions.
Unlike other industries where you need a specific license or certification to work in them, general contractors have the ability to take a construction project from blueprints to a finished product. In addition to managing all the facets of the build and bringing in subcontractors and skilled laborers, they can also order the appropriate materials for the job and ensure they are delivered on time. This is critical because if delays occur, it can put the overall timeline of a project over budget and potentially create a problem with weather, especially if a build spans multiple seasons.
Whether the construction project is large or small, a general contractor can save property owners money by sourcing and purchasing materials from a trusted network of suppliers that they have built relationships with over time. This can help them secure discounts that they would not otherwise be able to get. This is especially important during times of supply chain disruptions and dramatic price fluctuations.
A great general contractor will be proactive in understanding their clients’ needs and offering custom solutions to suit those needs. This could include using the latest health-conscious, energy-efficient materials available on the market. They will be able to provide options that are more cost-effective than the “norm” and pass these savings onto their clients.
For large projects, a GC will often have an office team that is responsible for the project management of all phases. These teams are made up of credentialed professionals, including architects, engineers, licensed builders, and certified project managers. They are also supported by administrative and accounting teams that manage finance, billing, and reporting for all project costs. This helps to keep projects on budget and on schedule, which is a big part of why a GC is essential for commercial and residential construction.
As a result of the wide range of skills and expertise that they have, general contractors are capable of providing comprehensive services to both commercial and residential building owners. They can manage the entire project from start to finish, or they can handle more specific aspects of a build like roofs and foundations. They can also serve as a liaison between the owner and the various tradespeople and vendors who bring the project to life.
Trenchless Drain Repair
When your sink, toilet, or tub begins to drain more slowly, it could signal that your drain or sewer is clogged. This could be due to corroded pipes, organic clogging, or ground shifting. Try unclogging the drain by using a plunger. If that doesn’t work, use a drain auger to remove the clog. Visit Drain Repair Near Me for more details.
 Traditionally, fixing a broken drain or sewer line would require extensive digging. This is because the pipes are buried underground and need to be exposed to perform a repair or replacement.
However, there is a less invasive alternative: trenchless drain repair. This method allows technicians to perform drain repairs without tearing up your yard, driveway, or sidewalk. It’s safe, quick, and more cost-effective than traditional methods.
Trenchless sewer repair is perfect for homes and businesses with outdated or damaged drainage systems. This minimally invasive technology allows your plumbing specialist to inspect your sewer lines, locate the issue, and repair or replace them. There are two main trenchless sewer repair techniques: pipe bursting and pipe lining.
Pipe relining is ideal for aging pipes, as it provides them with a protective lining that will prevent future issues. During this process, a technician inserts an epoxy resin-saturated tube into the existing pipe. Then, they create a restorative seal that’s as good as new.
The second option for trenchless drain repair is called “pipe bursting.” This method involves pulling a special head through the old pipe, breaking it apart and simultaneously towing a new pipe behind it. This technique is more effective for older pipes that are made of brittle materials like clay or orangeburg.
Both options for trenchless drain repair are much less invasive than traditional dig methods. They can save you time and money while keeping your landscaping, sidewalks, and driveway intact. Plus, they’re a lot safer for your family and workers.
Although these trenchless sewer repair options are great, they may not be suitable for every situation. For example, if your sewer line has collapsed or is back pitched, these techniques won’t work. But if your pipes are simply clogged with debris or have minor damage, then trenchless repairs will be perfect for you!
Before any trenchless sewer repair is performed, your plumbing specialist will send a camera down into your pipe system to assess the damage and determine the best course of action. After the inspection, they’ll use one of the above methods to repair or replace your damaged sewer pipes.
Pipe lining is a trenchless drain repair process that offers homeowners a better solution than traditional dig-and-replace methods. It involves feeding a fabric liner doused in resin into your old pipes and then inflating it to create a new pipe within your existing ones. This method can fix both short and long runs of pipes that don’t need to be upsized and will restore your drains to nearly-new condition. In order for the CIPP process to be successful, your pipes must be free of rust and scale buildup, root intrusion, and other damage. A professional plumber can use closed-circuit television or forced electron leak location (FELL) equipment to ensure that your pipes are ready for a lining.
Before piping can begin, your technician will need to create an access point to feed the liner into your pipes. Ideally, this will be at your sewer cleanout or sewer vent that is four inches in diameter or larger. If not, an access hole will need to be created in your yard.
Once the piping has been fed into your pipes, your technician will use air pressure to make sure it is completely in place. Once it is, the lining will be exposed to heat or UV light in order to harden and set. This will leave you with a new pipe inside your old one that should last for several decades.
If the lining isn’t working or your drains are still experiencing problems, your plumber may recommend another trenchless pipe repair option. Pipe bursting is another process that is similar to lining but destroys your old pipes as it pulls in the new ones. This will be your best option if your pipes are beyond repair.
Both piping options are great alternatives to traditional digging and can save you a lot of time, money, mess and yard destruction. But they aren’t the right solution for everyone. If your pipes are very damaged, you will likely need to hire a professional plumber to dig up and replace them. They will also be the best people to help you plan for future drainage issues as they can offer advice on preventative maintenance and other solutions.
When pipes burst, they can cause a lot of damage to your home. Water can start pouring into walls, ceilings, and insulation, causing major damage that requires costly repairs. This can also lead to mold and mildew, which is unhealthy for your family to breathe in. You can avoid this kind of problem by taking preventative measures.
The first step is noticing that your pipes are in trouble. If your toilets aren’t draining, or if you have puddles on the floor, these could be signs of a pipe that has burst. If you aren’t sure, you can always call a plumber to assess your situation. They can tell you what caused the pipe to break, and how best to repair it.
If your pipes are so damaged that they can’t be lined, we use a trenchless method called pipe bursting to replace them. This involves digging only two small pits around 4ft x 4ft in order to access the damaged pipe. Once the site has been prepared, a new HDPE (high-density polyethylene) pipe is pulled into place, replacing the damaged one.
This is a powerful and effective method that can be used to replace sewer lines as well as other types of underground pipes. It can be completed in much less time than conventional methods, and it can be done with minimal disruption to your property.
Besides water pipes, you can also have pipe bursting performed on storm drains and other drainage systems on your property. This is a great option if your drainage system is clogged with roots or other debris. You can also use this method to increase the size of your drainage line.
Water pipes can burst when they’re under too much pressure, and this can happen for several reasons. Over time, a clog can build up to the point where it becomes too much for the pipe to handle, and it will eventually crack under that strain. You can help prevent clogs and pipe bursts by practicing good drain maintenance, including regularly using a plumbing snake to clean your pipes, and being cognizant of what you’re putting down the pipes.
Your drains do a lot of work every day, removing waste water from your home or business and transporting it to the sewer line. Over time, they can become clogged with hair, food particles, grease, paper products and more. The build-up can impede the smooth flow of wastewater and cause pipe corrosion, settling or deterioration. If a drain becomes completely clogged, untreated sewage can back up into sinks, bathtubs and toilets, and can even spill out of the drain line itself into your yard or surrounding areas.
The best way to keep your drains functioning properly is by avoiding pouring items down them that don’t belong and placing a cover over all drain openings. However, sometimes these preventative measures are not enough, and you may find yourself needing drain repairs. These can range from a simple drain cleaning to excavating your sewer lines and replacing them.
When your drains are in need of repair, the first step is determining what caused the damage. You may need a specialized drain camera to locate the source of the problem and get a closer look. Once you have identified the issue, a plumber can then recommend the best option for drain repair.
Depending on the type of damage to your drain line, it can be repaired with either cured-in-place pipe lining, pipe bursting or excavation. The choice of which method is best depends on the factors that contributed to the damage, such as the age and condition of your pipes, the location of the damage, the distance from the closest municipal main and other considerations.
If the damage to your drain line is due to tree roots, a professional can use specialized equipment to cut and remove them. However, root removal is not a permanent solution; it is merely a temporary fix until the roots can grow back and re-invade your pipes.
Regardless of your business type, drain issues can be a huge problem and potentially shut your doors for good. Avoid the costly impact of these problems by partnering with the ZOOM DRAIN team for fast and focused commercial drain repair.
What Is Concrete Lifting?
Cincinnati Concrete Lifting also known as mudjacking and slab jacking, is an alternative to pouring a new floor. This repair method is far less messy and saves you money. Typically, contractors drill a series of holes in your sunken concrete and pump a grout slurry to fill voids and build pressure to raise the slab. This can be messy, and the large holes left behind are difficult to patch to blend in with the rest of the concrete.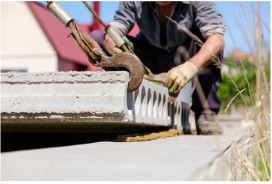
Mudjacking has been around for over 75 years and is used to lift concrete slabs that aren’t in need of a complete replacement. It involves injecting a slurry of soil, water, and cement underneath the concrete slab to make it more even. The proceso es rápido y can terminar en a pocas horas. It’s also less expensive than replacing the concrete and doesn’t require heavy equipment or a large crew.
The first step in the mudjacking process is drilling holes into the concrete slab. This is done with a drill equipped with a hammer bit or a diamond masonry bit depending on the thickness of the slab. The holes must be deep enough to reach the underlying soil. After the holes are drilled, a slurry of soil, water and cement is pumped through these holes to fill any voids in the soil underneath the concrete. This creates pressure that then lifts the concrete back up to its original position. Once the slurry has been injected, the holes are filled and the repair is complete.
There are a few drawbacks to mudjacking. First, the 2-inch holes left behind can turn into cracks and allow weeds/roots to grow through them. Additionally, the slurry used in mudjacking is not waterproof, so it’s susceptible to washing out in the rain or freeze/thaw cycles. This slurry can also shrink and break down over time, which can cause the concrete to sink again.
Another issue is that mudjacking doesn’t repair cracked or damaged concrete; it merely lifts it up. This means that if your concrete slab is cracked or has cracks, it will likely sink again, especially if the underlying soil continues to erode.
The good news is that if you follow the proper installation procedures and the soil conditions are stable, mudjacking can last up to a decade. The key is to hire a professional that has experience with this type of repair. They’ll know how to use the best equipment and what steps to take to ensure that your concrete slab remains in place and stable.
Slabjacking
Slabjacking is a method of raising sunken concrete slabs. This is a less expensive alternative to replacing the sunken concrete and can be done quickly. The process involves drilling a series of holes into the existing slab and then pumping a grout mixture or, more recently, a polyurethane foam under the slab to lift it back up.
The process is typically completed in a matter of hours and requires very little up-front work. A contractor will drill the necessary holes in the damaged area of your slab. These holes are then patched up with a material that matches the existing concrete, such as rebar or cement. Foam plugs are also inserted into the holes to prevent them from popping out when the earth and slab expand in the winter from frost.
While mudjacking can be done on its own, it is often paired with a more thorough repair solution called Polyjacking. Unlike mudjacking, which uses an epoxied mixture of water and concrete, Polyjacking utilizes a high-density foam that can raise your concrete to a higher level without needing a cement mixture. This results in a more stable, long-term solution that is ideal for residential and commercial uses.
Both methods are fast, inexpensive and very effective. Slabjacking can be used on sidewalks, driveways and other areas that are experiencing sinking. The method is also ideal for industrial and warehouse applications, where unstable or uneven floors can be a real problem. Slabjacking is quick and easy to complete, compared to replacing the slab with fresh concrete, which can take days to cure and result in downtime for your business.
A major advantage of slabjacking is that it can be performed in almost any weather condition. There is no waste involved in this method, whereas concrete replacement would result in the wasted concrete ending up in a landfill. This is better for the environment, as well as saving you money. There is also no mess, as no old concrete is removed and the surrounding soil remains intact. Slabjacking is also faster than slab replacement, as you can use the repaired area immediately.
Polyurethane Foam Injections
A variation on concrete lifting, and sometimes called foam jacking or poly lifting, this method utilizes polyurethane instead of mud to lift a sinking foundation. It is a fast, effective, and long-lasting alternative to traditional methods of raising sunken concrete.
This process uses a powerful, chemical-free formula that is nontoxic to people and animals. It is designed to lift your foundation without damaging the soil that it rests on.
Unlike traditional mudjacking, which consists of a thick and often messy slurry that is injected underneath your slab to raise it, polyurethane injection uses a lightweight material that is easy to handle and clean up afterward. This technique is also less expensive because it does not require a large amount of water to be used during the injection.
Holes the size of a dime are drilled into the sunken slab. Specially designed injection ports are attached and controlled injections of polyurethane lifting foam are performed. Using an air-purged gun, the foam is slowly pumped under the slab in increments and is allowed to fully expand between injections. This prevents over-raising the concrete slab.
Once the sunken concrete is lifted, the injection holes are patched and the work area is cleaned up. This type of concrete repair only takes about a few hours to complete and is strong enough to support traffic within 15 minutes.
Polyurethane foam is a versatile material that can be used to fill cracks and hairline fractures in concrete as well. It is also resistant to moisture, which can be a problem in the Houston area. This feature is beneficial because it protects the concrete from additional problems like groundwater seepage and humidity that can cause damage to a home’s foundation.
Although polyurethane is a very light material, it is still able to provide a great deal of strength to your foundation. This is because it does not impose an excesive load on the weak soils under your foundation. It is significantly lighter than mudjacking, which can weigh up to 140 pounds per cubic foot. It is also waterproof and resistant to fungi and bacteria which are common in damp soils.
Free Estimates
A sunken concrete slab is more than just an eyesore – it’s a safety hazard. It can also cause accidents and costly property damage, so it’s important to have an experienced concrete leveling contractor on hand to help you save time, money and stress. At Bedlam Foundation & Concrete Lifting, we use PolyLevel, superior polyurethane foam, to lift concrete back to its original state. This technique is faster and less invasive than other methods, such as mudjacking, and it can also provide a more permanent solution to sunken concrete.
Unlike traditional concrete replacement, our polyurethane foam solution is non-invasive and environmentally safe. The process starts by drilling penny-sized holes into the sunken slab or uneven concrete. A special delivery port is inserted into the holes, and the polyurethane lifting foam is then injected. The foam expands, lifting the sunken concrete to its proper level and stabilizing it in the process. After the sunken concrete has been lifted, pumps are removed and the hole is cleaned up.
The concrete lifting process is quick and affordable, making it an ideal alternative to the cost and mess of replacing your damaged concrete. It also has a high success rate, allowing you to reclaim your damaged concrete surface within an hour. Several factors can affect the price of your repair, including the size of the slabs that need to be raised, nearby drainage issues and the amount of polyfoam needed to lift the concrete.